Thursday, June 29, 2017

Play and Edit Sony A9 4K XAVC S on Windows PC

Sony's new advanced full-frame camera for professional photographers which called A9 can shot up to 100Mbps 4K UHD XAVC S video at 24p/25p/30p. When the shooting is completed, how to play and edit the 4K footage on Windows PC becomes a hot issue that people pay more attention to. The following article will offer beneficial tips and solutions to assist you to smooth play and edit Sony A9 4K XAVC S on Windows PC with best quality.

Play Sony A9 4K XAVC S on Windows PC

When you are searching on the Internet, you may be disappointed to find that there are hardly any media player software for Windows/PC to handle XAVC S video. In addition, the process of decoding 4K video is very CPU intensive, you can easily suffer video playback lagging, stuttering issue even you are fortunately enough to find a media player that can handle XAVC S video.

Compress and Transcode Sony A9 4K XAVC S for smooth playback

To smoothly play Sony A9 4K XAVC S on Windows PC or other devices such as smartphone, tablets, game consoles, HDTV, etc, it would be essential for you to convert and compress 4K XAVC S to the widely accepted and popular H.264 HD format with the resolution of 1920 * 1080 (best for computer or HD TV) or 1080 * 720 (best for smartphone or tablets).

Edit Sony A9 4K XAVC S

The good news is that many professional NLE editing software such as Final Cut Pro X, Adobe Premiere Pro CC, Davinci Resolve, Sony Vegas Pro, etc has upgraded with perfect support for 4K XAVC S footage support. However, you will fail to import and edit the Sony A9 4K XAVC S with some consumer video editing software or free video editing software. In addition, sometimes, even your professional NLE editing software has the capability to handle 4K XAVC S video, but if your computer doesn't meet the minimum requirements to edit 4K video, you will only find the footage skips and jumps and finally makes it impossible to edit with any real fitness. To fix this problem, you can choose to buy a new computer, create a proxy files with lower resolution or directly compress 4K to 1080p which will ensure you a smooth editing workflow on any old computer with less power.

Best tool to convert and compress Sony A9 4K XAVC S

If you are looking for a powerful yet simple to use application to convert and compress Sony A9 4K XAVC S, you can't miss Pavtube Video Converter, which has full support for Sony A9 4K XAVC S video, you can easily compress 4K to 1080p by outputting 4K video to a HD file format. The program offers various HD format options for you to choose from, such as popular digital HD format like HD H.264, HD H.265, HD AVI, HD WMV, HD MPEG-1, HD MPEG-2, HD MKV, etc or smartphone, tablets, game consoles, TVs or editing program best favorable editing HD file formats.

Edit Sony A9 4K XAVC S video with built-in editing tools

Apart from converting and compressing Sony A9 4K XAVC S, the program also works as a perfect 4K video editor. You can do a lot of simple video editing tasks with its built-in editing functions. You can trim or cut video to remove unwanted parts or segments, crop video to cut off unwanted black borders or area, deinterlace interlaced video into progressive form, adjust picture effect like brightness, contrast, saturation or apply special rendering effects like Gray, Flip Color or Aged Flim, etc to your video or add external SRT/ASS/SSA subtitles to videos.

Step by Step to Convert and Compress Sony A9 4K XAVC S for Better Playing and Editing

Get Pavtube Video Converter with 20% off discount, coupon codec: 45K2D47GJH

Step 1: Load Sony A9 4K XAVC S into the program.

Start the program on your computer, click "File" menu and select "Add Video/Audio" or "Add from folder" to import Sony A9 4K XAVC S video.

Load Sony A9 4K XAVC S video

Step 2: Choose output file format.

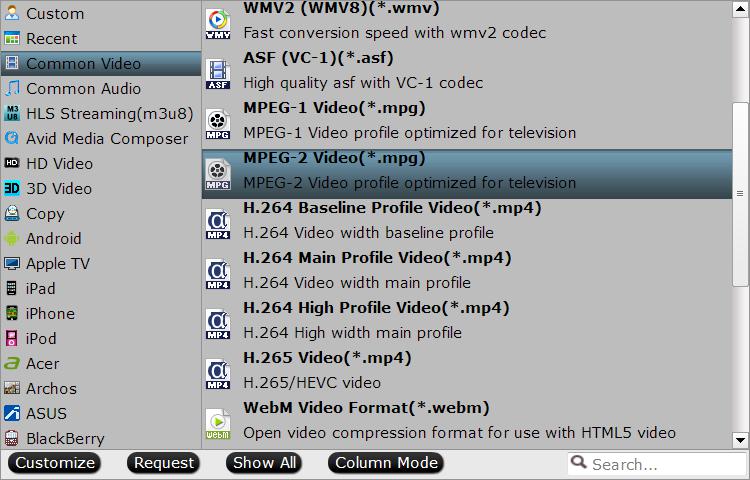
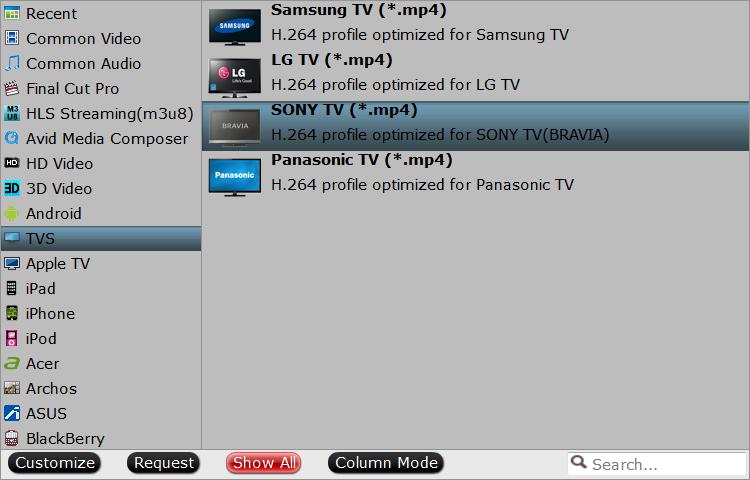
To downscale Sony A9 4K XAVC S to 1080p, you can choose to output a popular HD file format such as "H.264 HD Video(*.mp4)" under "HD Video" main category, you can also choose to output other HD file formats according to your own needs.

 Choose output file format

Tips: Click "Settings" icon on the main interface to open the "Profile Settings" window, from "Size(pix)" drop-down options, select "1920*1080 or "1080*720 to compress 4K to 1080p.

Step 3: Edit Sony A9 4K XAVC S video.

On the top tool bar on the main interface, click the pencial like icon to open "Video Editor" window, you can trim Blu-ray movies to remove the unwanted parts by setting the start and end time, crop to remove the black borders or unwanted area by dragging the dash line around the video frame, flip video, add text/image/video watermark, change video picture effect, replace/remove audio in video, add external subtitles, etc.

Edit Sony A9 4K XAVC S video

Step 4: Start the conversion process.

After all settings are done, click right-bottom "Convert" button to begin to convert and compress Sony A9 4K XAVC S to 1080P or 720p H.264 file format.

When the conversion is completed, you will have no problem to play and edit DJI Phantom 4 Pro+ video on any devices or with any editing program on Windows PC.

Thursday, June 22, 2017

MP4 Won’t Played on DVD Player, Solved!

Have some online downloaded movies, TV shows or device recorded footage in MP4 file format and wish to get them played on your home DVD players. The bad news is that regular DVD players only read an MPEG-2 DVD structure file, and very few of them are compatible with MEPG-4 video. The good news is that you can convert MP4 to DVD player compatible file formats such as MPEG-2 or VOB for playing through DVD player’s USB port or directly burn the files onto a DVD disc for viewing on DVD player. The following article will illustrate those 2 solutions for you with great detailed information.

Convert and play MP4 on DVD Player via USB port
Burn MP4 to DVD disc for DVD Player viewing

Convert and play MP4 on DVD Player via USB port

As technology continues to advance, you don't even need to burn home movies to disc to watch them on your television. High-end DVD player models feature USB inputs that can be used to house USB flash drives filled with movies. You can then access the files through your DVD player's main menu and watch them on your TV screen.

If you fail to open the MP4 files stored on USB flash drive with the DVD player, then it would be essential for you to perform a format conversion process. Here, you can get the job easily completed with a simple to use application called Pavtube Video Converter Ultimate. The program has full support for all MP4 files with various different file resolution and video/audio compression codec, you can easily produce DVD player readable MPEG-2 or VOB format with best file quality and fast conversion speed.

To get better output video and audio quality, you can flexibly adjust output profile parameters including video codec, resolution, bit rate, frame rate, audio codec, bit rate, sample rate, channels, etc as you like.

Hot Search: Play MKV on DVD Player | Play MP4 on DVD Player | Play MOV on DVD Player

Get Pavtube Video Converter Ultimate with 20% off discount, coupon codec: 45K2D47GJH

Simple steps to Convert MP4 to DVD Player Supported File Formats

Step 1: Import MP4 files into the program

Step 2: Output DVD player supported MPEG-2 format.

output DVD to MPEG-2 format

Output DVD player supported file formats

Step 3: Adjust output profile parameters.

Step 4: Begin the conversion process.

When the conversion is completed, following the steps below to transfer and play converted files on DVD player from USB port.

Step 1: Put your USB flash drive into a USB port on your computer.
Step 2: Open your USB flash drive by clicking on "My Computer" and then clicking on the icon for your flash drive.
Step 3: Drag the appropriately formatted video files into this window. They will now be transferred to your USB flash drive.
Step 4: Remove the USB flash drive from your computer.
Step 5: Put your USB flash drive into an open USB port on your DVD player.
Step 6: Use your DVD player's remote control to navigate to the "USB Flash Drive" menu. Select the file you want to play from the list by highlighting it and pressing the "Enter" or "Play" buttons on the remote. The file will now play on your TV screen.

Burn MP4 to DVD disc for DVD Player viewing

Burn MP4 files to DVD disc is pretty easy with a reliable and workable DVD burning software such as Pavtube DVD Creator (get Mac version). The program offers powerful DVD burning functions and beneficial DVD menu editing features. You can comprehensively burn all 4K/2K/HD/SD MP4 files with the compression codec of MPEG-4, H.264, H.265, VC-1/WMV, MVC, MPEG-4 (A)SP, MPEG-1, MPEG-2, etc to DVD disc. The versatile DVD menu customizing features allow you to customize the DVD menu template/style, menu text, display aspect ratio and background, you can also set chapter maker and playback mode.

Step by Step to Burn MP4 to DVD Disc for DVD Player Watching

Step 1: Insert a blank DVD disc into your computer optical drive.

Insert a blank DVD-R (DVD+R, DVD+RW, DVD-RW) into the DVD-ROM drive of your computer.

Step 2: Add MP4 video into the program.

Run the DVD Creator software, import Halloween videos or movies into it for burning DVD disc project.

Add MP4 video

Step 3: Customize DVD menu.

Switch to the menu pane, double click a DVD menu beneath the Menu Template to apply it to your DVD. You can customize the background video/image, background music, text, title thumbnail and more for your DVD menu. You can also choose the DVD quality at the bottom of the software, higher quality requires bigger DVD disc volume.

Customize DVD menu

Step 4: Start MP4 video to DVD burning process.

Click the "Burn" button to start burning Halloween videos to DVD. You can burn MP4 video to DVD disc, save as ISO file or Generate to DVD Folder.

Burn MP4 to DVD

Thursday, June 15, 2017

Movavi Video Converter Alternative for Windows

A powerful video converter like Movavi Video Converter is essential to have in our daily life for us to convert video to any format, save to any devices or compress large file size into small for space saving. However, sometimes, we may need to find an alternative to Movavi Video Converter for Windows to import more media types or file formats, produce more output format options with perfect quality and super fast conversion speed.

An beneficial video conversion tool can do more than just conversion. You can also treat it as a small video player, a simple video editor. For advanced users, you can also use it to compress file size, change codec, bit rate, sample rate, channels, etc to get better quality. Pavtube Video Converter Ultimate (review) can fullfil all your great demand, so we highly ranked it as the best windows alternative to Movavi Video Converter.

Main functions of Pavtube Video Converter Ultimate

- Full importing support for commercial Blu-ray/DVD disc and digital video
- Various output format options: popular digital formats and devices/programs preset profile formats
- Batch conversion mode to load multiple video at one time
- 6x H.264 encoding acceleration and 30x H.265 encoding acceleration
- Trim/Crop/Merge/Split/Watermark/Apply effect/Add subtitle/Deterlace video
- Fine tune output profile parameters to get better video/audio quality
- Perfect compatibility with the new macOS Sierra 10.12, 10.11, 10.10, 10.9, Windows 10/8.1/8/7

Pavtube Video Converter Ultimate VS Movavi Video Converter

The better distinguish Pavtube Video Converter Ultimate and Movavi Video Converter, we will show you a comparison charts with detailed comparison parameters of this program.

Software Pavtube Video Converter Ultimate Movavi Video Converter
Input File Formats
Blu-ray Disc/BDMV Folder

-
DVD Disc/Video_TS Folder/IFO/ISO Image File

-
AVI/WMV/MP4/MOV/MKV/FLV/3GP/ASF/WebM

MXF

AVCHD MTS/M2TS

XAVC/XAVC S

-
H.264

H.265

MEPG-1

MPEG-2

Prores

WMV/VC-1

Divx/Xvid

Output File Formats
AVI/WMV/MP4/MOV/FLV/MKV/VOB/3GP

HD AVI/WMV/MP4/MOV/MKV/MPEG-2/H.264/H.265

no HD H.265 output
4K H.264 High Profile MP4

-
4K H.265

-
Prores 4444/422 HQ/422 Proxy/422 LT

-
3D SBS/TAB/Anaglyph MP4/MKV/AVI/WMV/MOV

-
Device Preset Profile Formats

Advanced Features
Adjust output profile parameters

-
Trim/Merge

Crop/Rotate

Add Watermark

Split

-
Apply Special Effects

-
Insert External Subtitle

-
Remove/Replace Audio in Video

-
Nvidia CUDA or NVENC Acceleration

-
Supported New Windows OS
Windows 10
Windows 10

Conclusion:

From above comparison charts, we can see that Pavtube Video Converter Ultimate has more media input and output options and also more editing and output profile customization function than Movavi Video Converter. All those great functions and features can help to enhance your media entertainment to another great high level.

Wednesday, June 7, 2017

Play MP4 on TV from USB

It is likely that you may Have downloaded some movies from online video sharing sites with MP4 file formats or captured a MP4 video with your camera, camcorder, smartphone or tablets, you may often feel confused that your TV even can't recognize your USB storage devices or you can play certain MP4 files from USB on TV but fail to play other MP4 files due to the unknown reasons. The following article will illustrate those problems for you with helpful tips and solutions.

Why your TV not read your USB drive?

Do not simply assume that because a television has a USB port, it can play files from a USB drive. In some case the port is solely designed for use by engineers who need to run software on the television, for example to update or repair the set. Some sets may only be able to display video files once you have enabled an option in a service menu that isn't officially publicized to consumers; take care with such menus as you could affect the TV's performance by changing service menu settings.

Why fail to play certain MP4 files on TV from USB?

If your TV does support video playback from USB, the main factor that affects your ability to watch a particular video is the file format. You will need to consult the user manual or promotional material for the particular set to see which formats it supports. It is well known that MP4 is a container file format, which can be encoded with vavrious different video and audio codec, your TV may only supports to play certain MP4 files with specification compression codec such as H.264, H.265 within specification resolution and resolution range.

To solve "TV not playing MP4 from USB" issues, you will need a MP4 to TV Converter. Here, a powerful yet simple to use application called Pavtube Video Converter Ultimate is highly recommended to you. The program has full support for all MP4 file types listed below:
Video codec: MPEG-1, MPEG-2, MPEG-4 (A)SP, H.264/MPEG-4, H.265/HEVC, VC-1/WMV, Real Video, Theora, Microsoft MPEG4 V2, VP8, MVC
Audio codec: MP3, WMA, AAC, AC-3, DTS,ALAC, DTS-HD

You can easily convert MP4 to TV supported file formats. And then flexibly adjust output video and audio quality by flexibly adjusting output profile parameters including video codec, resolution, bit rate, frame rate, audio codec, bit rate, sample rate, channels, etc as you like. For those people who have no ideal how to adjust those settings on your own, you can use the program to directly output MP4 to Sony/Samsung/LG/Panasonic TV Preset Profile formats with the optimal playback settings.

For Mac users, please download Pavtube iMedia Converter for Mac to get the job completed on macOS Sierra or macOS High Sierra.

Free download Windows version

Free download Mac version

How to Convert MP4 for TV Playback via USB?

Step 1: Load MP4 files into the program.

Download the free trial version of the program. Launch it on your computer. Click "File" menu and select "Add Video/Audio" or click the "Add Video" button on the top tool bar to import source MP4 files into the program.

Load MP4 files into the program

Step 2: Define the output format.

Clicking the Format bar, from its drop-down list, choose one of TV playable file formats such as "H.264 HD Video(*mp4)" under "HD Video" main category.

Define the output format

Tips: Click "Settings" on the main interface to open "Profile Settings" window, here, you can flexibly choose or specify exactly the profile parameters including video codec, resolution, bit rate, frame rate, audio codec, bit rate, sample rate, channels, etc as you like to get better output video and audio quality.

If you have no idea how to adjust output profile settings on your own, just choose to output Sony/Samsung/LG/Panasonic TV preset profile formats.

output TV preset profile formats

Step 3: Begin the conversion process.

After all setting is completed, hit the "Convert" button at the right bottom of the main interface to begin the conversion process from unsupported MP4 to TV supported or preset profile formats.

When the conversion is finished, click "Open Output Folder" icon on the main interface to open the folder with generated files. Then feel free to transfer the files to USB drive for viewing on your TV.